
If you’ve always wanted to take epic night sky images, but don’t know what the best astrophotography settings are or how to improve your skills, you’ve come to the right place!
In this creative tutorial we’re going to do dive deep into one of our favourite styles of long exposure photography, with the aim to teach you how to get out there and shoot incredible Milky Way images.
Whether you’re a complete beginner who doesn’t know where to start with camera settings, or a professional who is looking to expand their skills, we’re here to help.
We’ve been working as professional travel photographers for almost a decade now, with astro images becoming one of our best-known disciplines.
Ready for our best astrophotography tips and settings? Let’s dive into it!
Table of Contents
- The Best Astrophotography Settings for Beginners – A Quick Guide
- Recommended Gear for Astrophotography
- Expert Settings and Advanced Techniques for Astrophotography and Night Sky Shots
The Best Astrophotography Settings for Beginners – A Quick Guide
One of the most common questions we get from people is “what settings should I use for astrophotography?”
If you’ve never really shot Milky Way photography before, then you’re going to love this!
The first thing you need to do is find somewhere with very little light pollution, and head out to take photos within a few days either side of the new moon so you can really see the stars.
Then it’s time to take some long exposure pictures!
Here are the best camera settings for astrophotography we recommend for people just looking to capture shots of the stars without thinking too much about it
Astrophotography Settings Cheat Sheet
- Use Manual Mode
- Aperture – f/2.8 (or the smallest number your lens can go)
- Shutter – 25sec
- ISO – 3200
- White Balance – Auto
- Manually Focus on Brightest Star
- Focal Length – 16/20/24mm
- File Type – RAW
- Self Timer – 2 seconds
- Long Exposure Noise Reduction – Off
- Place Camera on Tripod
And that’s literally all there is to it!
If you head outside on a clear night, set your camera up on a tripod, point it at the Milky Way and use these settings, you should be able to capture a fantastic image that you can be proud of.
Of course there are a lot of different elements that come into play that would affect the end result, and as soon as you start to get a bit more experience you’re going to want to experiment with different settings for astrophotography.
But if you follow the above guide you’ll be off to a good start!
Now let’s dive into why we choose these particular astrophotography settings.
READ MORE: Here are all of our favourite waterfall photography tips so you can take gorgeous, silky shots of cascades!
Aperture – Large
In basic terms, aperture is the opening at the front of the lens that lets in light.
The wider, or larger, the opening is, the more light can come through and hit the sensor. The smaller the opening is, the less light comes through.
Besides the amount of light it lets in, it also affects the depth of field of the image.
- Wide aperture = shallow depth of field.
- Small aperture = long depth of field.
That last part is very important to learn about, but for now we’ll talk about the light side of things.
Because you need to be shooting astrophotography when it is dark outside, there isn’t much light available for the sensor to read.
So you need to help the camera get the most light available by making the aperture as wide open as possible.
Great astrophotography lenses will be able to open up as wide as f/2.8, or even wider (f/1.8, f/1.4, etc).
Considerations
When you’re shooting at a wide aperture the depth of field is going to be very narrow. That means when you focus on the stars, the foreground will be a little bit blurry. Something to remember.
Shutter Speed – Slow
Shutter speed is how long the shutter on your camera remains open, which directly affects how long light is being registered on your sensor.
It also has other effects on photography, such as the ability to introduce motion blur, but for astrophotography settings we’re going to focus on the light side of things.
The longer your shutter is open, the more time the faint light from the stars has to embed itself on your image.
For the purpose of night sky astrophotography, aim to have your shutter open for around 25 seconds to start with.
This gives ample time for the stars to show up on your photo.
Considerations
While your shutter is open your camera needs to be perfectly still so you don’t introduce any motion blur to scene. That’s why you use a tripod.
A slow shutter speed can also result in faint (or large) star trails thanks to the earth rotating.
How long your shutter speed can stay open without seeing any star trails is directly related to your focal length, which we dive into below under ‘The 500 Rule’.
But for beginners just remember that as long as you’re using a wide angle lens, somewhere around 25 seconds as a shutter speed will be fine.
ISO – High
“What ISO should I use for night sky photography?”
In the most basic terms, ISO affects how sensitive your camera sensor is to light, which directly affects the brightness of an image.
A low ISO (such as 100) means that the sensor isn’t very sensitive to light, and will result in a darker image, depending on your camera settings.
A high ISO (such as 3200) will make your sensor more sensitive to light, and will result in a brighter image.
When you’re taking a photo of the night sky, you want your image to be bright. That’s why you want to turn your ISO up high.
In almost all other styles of photography, especially landscapes, you want your ISO to be as low as possible. But astro is different.
Considerations
A higher ISO results in grain, or noise, showing up on your photo. This drastically affects your image quality.
High-end professional cameras can handle higher ISOs really well, while cheaper cameras often struggle with that.
You can fix the issue with some noise reduction when editing the photo, but you can never get the image as sharp and clean as shooting with the lowest ISO possible.
White Balance – Auto
The white balance is what kind of colour tinge your image has. It can be warmer (yellows/oranges) or cooler (blues/purples), depending on the number you set, known as Kelvin.
There is no perfect white balance for Milky Way photos. It all depends on your own personal style and what you like. But if you don’t know where to start, we recommend leaving it in auto.
This lets your camera choose the white balance automatically using a computer algorithm, and is one less thing to worry about.
But if you’re shooting in auto white balance (AWB), there’s one big tip we have for you!
Shoot in RAW.
This allows the image to maintain all the colour details without compression, so you can adjust it to whatever you like later in a program like Adobe Lightroom without damaging the photo.
Bonus: Use this link to get a special deal on Adobe Lightroom and Photoshop when you sign up!
Considerations
Cameras often struggle with getting the perfect white balance for night photos when set to auto, and you may end up with a warmer image than you like.
If you’re shooting in RAW, it’s not so much an issue as you can fix that later. But to save time and get the image as close to perfect, we do recommend setting your white balance ahead of time.
We personally prefer cooler night sky images, as it looks more natural. A number around 3200K is a good place to start.
Remember – SHOOT IN RAW!!!
Focus – Manual
When you’re taking a photo of the Milky Way, you usually want the stars to be sharp and in focus.
New cameras have fantastic auto focus capabilities, but even the best, most expensive cameras struggle with focusing when it’s pitch black outside.
Get rid of the margin for error by switching your camera to manual focus and adjusting it to make sure the stars are sharp.
As a tip to help with this, focus on the brightest star (it’s easier to see), and use focus magnification if your camera has this feature.
Considerations
Manually focusing on stars takes time to get right, and unfortunately it’s not as easy as just setting your focus ring to ‘infinity’ and forgetting, as every model of lens is slightly different.
One thing you can do is mark on your lens with a bit of tape where true infinity is so you can find it quicker out in the field.

Focal Length – Wide
A wide angle lens (think 16mm for full frame cameras, 10mm for APS-C cropped sensors) allows you to fit in as much sky and foreground in one shot as possible.
The wider the focal length, the less chance you have of capturing slight star trails on a long exposure too, thanks to the 500 Rule.
Considerations
Shooting with a wide lens does require care when composing your shot, thanks to things like lens distortion on the edges of the frame.
But just like anything, practice makes perfect.
Wide shots also make the Milky Way look quite small compared to whatever is in the foreground.
File Type – RAW
In order to get the most detail and possibilities for editing in your photos, you need to be shooting in RAW format, rather than JPEG.
RAW is a file type that doesn’t use any (or very little) image compression, meaning a lot more details are maintained in the colours, shadows and highlights.
This gives you lots of power when editing, and we highly recommend you get used to shooting in RAW.
Considerations
RAW files are larger, so you need more storage. Make sure you have ample space on your SD cards and hard drives.
RAW files also need to be post processed using software like Adobe Lightroom before you can print or share them.
Self Timer – 2 Seconds
In order to get a still, sharp long exposure image without any motion blur, you need to use either a remote shutter release or a timer delay.
Remotes are great, but obviously are an extra accessory that costs money.
Using the cameras in-built time delay is free and can achieve the same result.
Just place your camera on a tripod, select a self timer (2 seconds is usually adequate, but you can push it out to 5 or 10 seconds if you prefer), hit the shutter then wait for the camera to do its thing.
Long Exposure Noise Reduction – Off
A lot of cameras have an in-built feature called ‘long exposure noise reduction’. This is basically an algorithm that automatically tries to eliminate any noise created from shooting long exposures at high ISO.
Sounds great in theory, but cameras just aren’t that good at it (yet), and will never be as effective as doing it manually when editing your photo.
It also doubles the length it takes to take a photo, as you have to wait for the camera to work its magic after the shot is taken.
Do yourself a favour and turn this off.
Recommended Gear for Astrophotography
Now that you know all the astrophotography settings to use to take pictures of the Milky Way and night sky, you need to make sure you have the basic camera gear to achieve the best results.
Don’t stress – you don’t need to go out and buy the best cameras on the market if you don’t want to!
In fact you can take astro photos using smart phones and GoPros these days.
But if you want to get better results, you’ll need at least the following items.
Mirrorless or DSLR Camera
Mirrorless and DSLR cameras are perfect for astrophotography, as they allow you to use interchangeable lenses, have manual photo modes and usually have better low-light performance than point-and-shoot cameras.
We personally use and recommend Sony full-frame cameras like the A7iii or A7Riii, but you can start off with any model that fits your budget.
Check out our recommendations of fantastic cameras for all budgets in this post.
Fast Wide Angle Lens
A wide angle lens lets you capture as much of the Milky Way as possible, and if it’s fast (has a wide aperture like f/2.8), you can let more light into the sensor with a lower ISO.
If you’re shooting on an APS-C camera, look for a lens around 8-12mm.
On a full-frame, look for something between 12-24mm.
READ MORE: Check out all of our epic travel photography tips so you can take better images on your next holiday!
Tripod
Almost as important as the camera, and completely essential when it comes to astrophotography.
A tripod will let you position the camera on something stable, removing any chance of camera shake caused by your hand moving when using a slow shutter speed.
See our top tripod recommendations in this article.
Expert Settings and Advanced Techniques for Astrophotography and Night Sky Shots
Now that you’ve learnt the art of capturing night sky images and have found a location with no light pollution, you might be wondering if there are any other things you need to know when playing around with astrophotography settings.
And the answer is yes, there is!
Here we go.
The 500 Rule
We’ve mentioned it a few times, but now we’re going to explain what the 500 Rule is.
Because the earth is rotating (sorry flat-Earthers, it’s a fact), the stars and Milky Way will be moving across the night sky.
It happens too slowly for the naked eye to notice, but your camera will see it when doing a long exposure!
The 500 rule is a simple formula that allows you to figure out exactly how slow a shutter speed you can use based on the focal length of the lens your using before you start to see start trails. Here’s how it works:
500 / Focal Length = Maximum Shutter Speed
As an example, let’s say you’re using a 16mm lens on a full-frame camera.
500 / 16 = 31.25
That means you can use a 30 second shutter speed without seeing star trails.
Using a 50mm lens?
500 / 50 = 10
10 seconds is the longest you can go.
That is for full-frame cameras. If you’re using a crop sensor, you need to multiple the focal length you have by the crop factor. For a Sony APS-C sensor, that is 1.5.
So 10 x 1.5 = 15.
500 / 15 = 33
You get it.
By sticking to the 500 Rule, you’ll make sure that your stars are super sharp pin points, without any trails.
Lens Compression
If you are shooting a lot with a wide lens and are starting to feel like the Milky Way looks too small in your shots, it’s time to try playing around with lens compression.
Lens compression is an effect that zoom lenses has where the background of a scene (ie the Milky Way) appears to be closer to the foreground.
This is a great tool to use to really add unique character to your shots.
Using Extremely High ISO for Composition Adjustments
This is more of a secret little photography hack rather than an advanced technique, but it’s great to know regardless.
Ever set up the shot, hit the shutter and waited 30 seconds only to find out that you accidentally got your composition slightly off?
So you readjust, hit the shutter, wait 30 seconds, and it’s still not right?
Yep, it’s a waste of time. And frustrating.
So here’s what you do instead!
To nail your composition quicker, push your ISO as high as it will go (102,400 for example), then use a short shutter of 1-2 seconds.
Remember, the high ISO will make your image brighter.
Now you’re only waiting a few seconds to check your composition before getting your proper camera settings right.
Yes, those images will look like crap with the all that noise, but you can delete those photos later so don’t worry about it.
Noise Stacking
A great advanced astrophotography technique if you want to get the absolute cleanest images of the Milky Way is noise stacking.
What you do is take multiple consecutive images of the stars, then bring them into a post-processing program like Adobe Photoshop or Sequator and stack them onto of each other to get brilliant noise reduction.
This technique works by using computer algorithms to match up the parts of the image that are the same (the stars) and remove the parts of the image that are in different positions (noise).
It’s quite a time-consuming and advanced technique that requires a powerful computer, but the results are fantastic.
Here’s a good tutorial on how to do it.
Star Trails
Capturing star trails can be a very easy or very time consuming process, but if you want to add a real artistic flair to your astro shots, it’s a great skill to have.
It doesn’t represent a true-life shot as it is obviously a long exposure effect, but it does look excellent and makes for incredible images.
Here’s the two ways to do it.
Long Single Exposure
The easiest way is to simply put your camera on a tripod, set the shutter to ‘bulb’ mode, then use a remote that has a lock feature to open the shutter for an extended period of time.
Something like 30-60 minutes for example.
Afterwards you’ll end up with one photo that has all the movement in the stars, creating amazing star trails.
- Pros of this method – Easy to execute, one image for quick editing
- Cons of this method – Lots of noise in the image, can end up with blemishes in the shot due to periodic light bursts from cars, planes, etc
Multiple Exposures
The cleanest way to create star trails in a photo is to take a series of astro shots and blend them together in your favourite editing program.
To do this, set your camera on a tripod and use the in-built time lapse mode or an intervalometer to take anywhere from 100-200 consecutive photos with the correct astrophotography settings outlined above.
Then you bring them all into your editing software (we use Adobe Photoshop), and stack them on top of each other.
Because the stars will have rotated a few pixels in each photo, the end result will have them streak across the sky.
- Pros of this method – Results in a very clean image of the stars. Lots of editing control. Can omit individual images if they are corrupt for some reason.
- Cons of this method – Requires lots of time (and a powerful computer) edit.

Focus Stacking
When you’re shooting at a wide aperture like f/2.8, your depth of field is going to be very shallow. This will mean elements of your image may be out of focus.
This becomes very noticeable if you have something close in the foreground. You’ll find either the foreground is blurry, or your stars are blurry.
To fix this you need to use a technique called focus stacking. This is where you take multiple images, changing your focus point in each one.
Essentially you set your camera up with your favourite composition, then take two (or more) photos, focusing on the foreground elements, the stars, and anything else that may fall in between.
You then layer all of those photos on top of each other in Photoshop and blend in the parts that are in focus so you end up with one image with everything sharp.
It’s requires a bit of post processing skills and time, but the end result is fantastic.
Time Blending
One common problem you’ll find when shooting in the middle of the night is that everything is, obviously, very dark. That can make it difficult to show any details in your subjects.
There’s two ways you combat this. Light painting (which we’ll go into next), and time blending.
Time blending is where you take photos at different times of the day then merge them together in Adobe Photoshop.
For example, you get to your location and set up when there is still lots of ambient light about. You take a photo of the landscape at blue hour when you can use a low ISO and still get a perfect, clean exposure. Then you wait until it’s dark to take the astro shot.
Once you blend them, the end result is that you have a very clean and nicely exposed image.
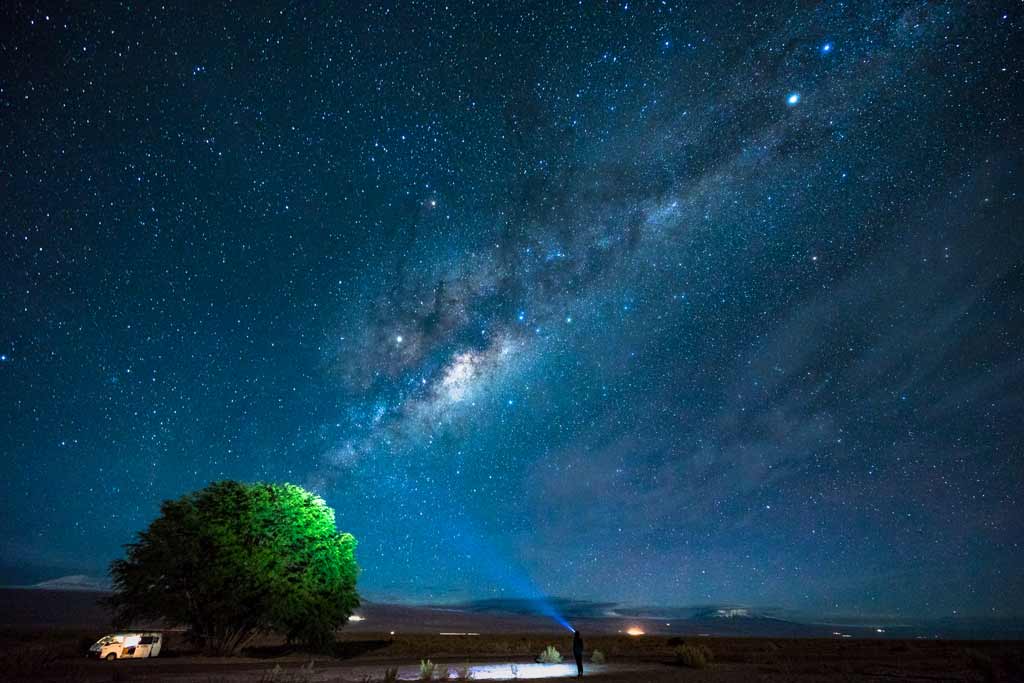
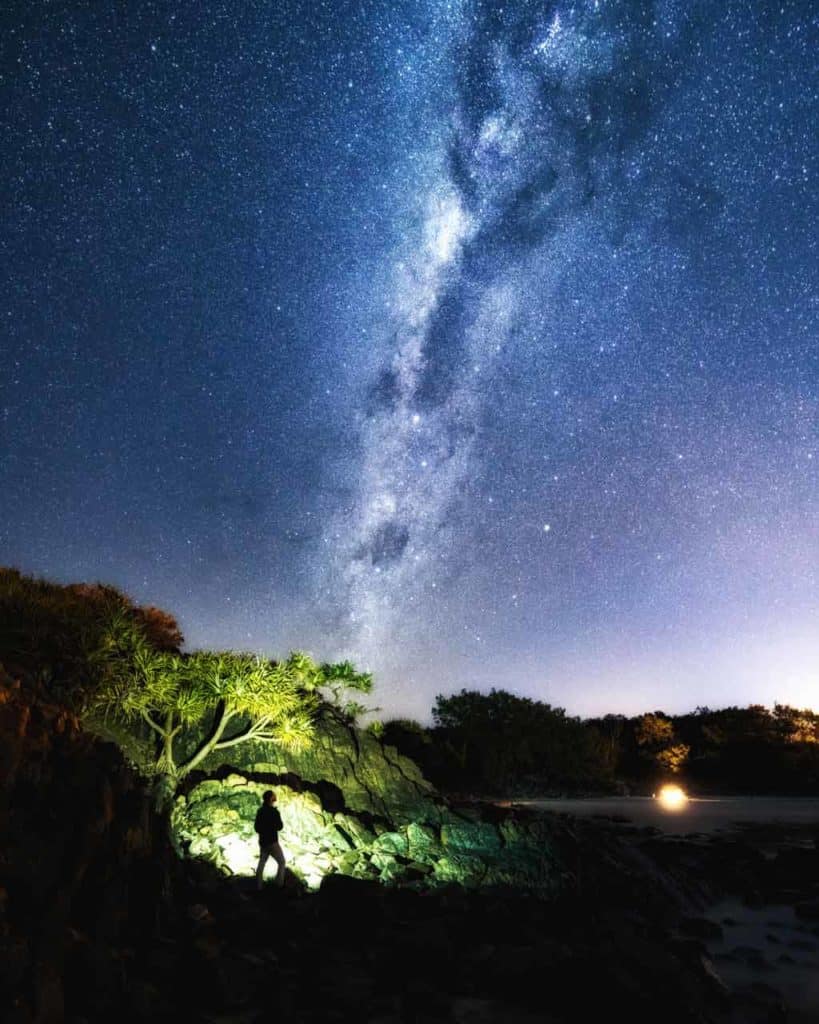
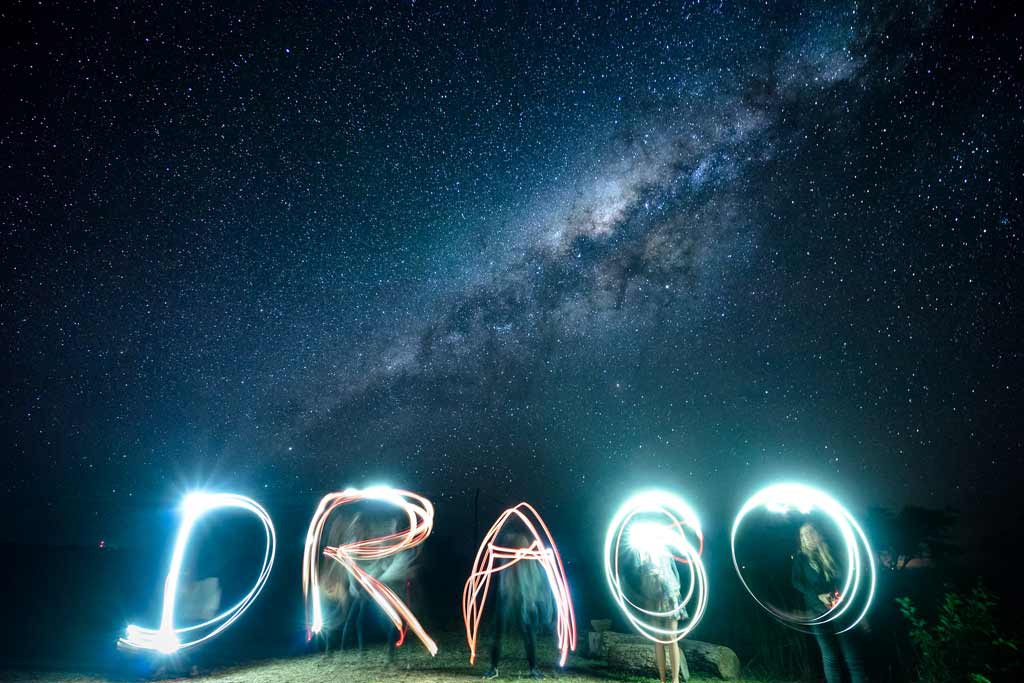
Light Painting
It’s exactly what it sounds like – painting with light.
While your shutter is open you take a source of light (torch, head lamp, phone, etc) and simply paint the beam over your subject to show it more clearly.
You can also use this technique to draw pictures, write words and cast cool light waves through your shot.
Focal Length Stacking
We’re starting to dive deeper into digital art. Focal length stacking is where you take one shot of the foreground (16mm perspective for example), then blend it with a separate shot of the Milky Way using a different focal length (85mm for example).
The end result is a wide landscape shot that has a larger Milky Way looming above the sky.
Composites
Composites are taking photos from two entirely different scenes and blending them together.
You may have a beautiful landscape shot you took at blue hour from Patagonia, but the night was cloudy. If you want to produce a shot where you also have an astro element, you can replace the sky with a Milky Way photo you took elsewhere.
This is considered to be digital art more than pure photography, but in our opinion as long as you are honest about how you created the image rather than pretending it’s real, we have no problem at all with this.
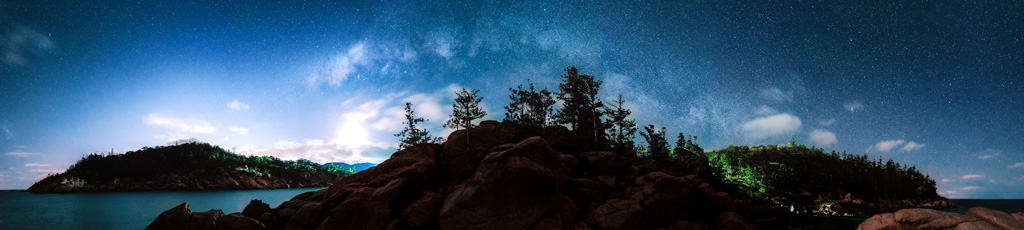
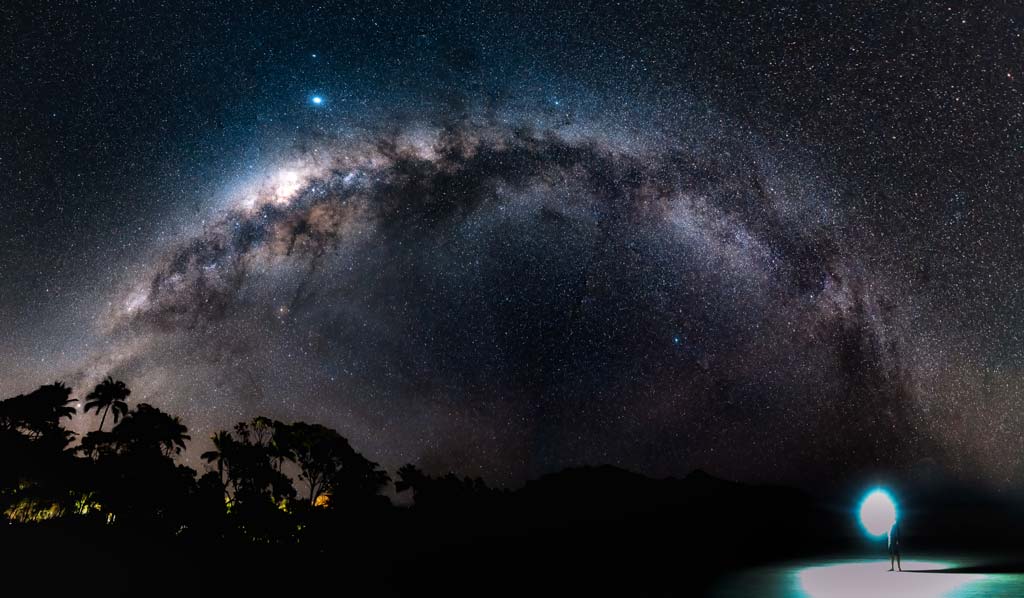
Panoramas
You have probably already noticed this from hours of staring up at the stars, but the sky is BIG! Way too big to capture all in one shot. That’s where panorama astrophotography comes into play.
Start from one end of the shot you want to capture (far left, far bottom, etc), take an image then pan the camera across and take another photo, ensuring you keep about half of the previous frame in the exposure. Repeat until you are at the end of the composition.
Blend all the shots together in Adobe Lightroom or Photoshop, and you have a big sky astrophotography shot to show off!
Tracking
If you take your astrophotography seriously and really want the cleanest star shots possible, you’ll need to get into tracking.
This is where you use a specialised, machine-powered tool to automatically rotates your camera across the sky, tracking the stars at an exact speed and angle.
This allows you to use a lower ISO and open up your shutter speed for minutes at a time to capture a huge amount of light, colour and detail in one exposure.
A camera-mounted star tracker is not cheap, bit if you want to take your camera settings for astrophotography to the next level, this is a fantastic tool.
Deep Sky
Deep sky photography is where you capture telescopic-like images of stars, clusters, nebulae, dust and galaxies.
To achieve this you need to attach your camera to a telescope using a special adaptor, a telephoto lens and a star tracker.
Deep Sky is not an easy style of photography to get into, but the images are incredible.
DISCLAIMER: Some of the links in this article are affiliate links, which means if you book accommodation, tours or buy a product, we will receive a small commission at no extra cost to you. These commissions help us keep creating more free travel content to help people plan their holidays and adventures. We only recommend the best accommodations, tours and products that ourselves or our fantastic editorial team have personally experienced, and regularly review these. Thanks for your support, kind friend!


3 thoughts on “Astrophotography Settings – Tips and Secrets for Epic Shots (2026)”
Great tips! The section on tracking and focusing techniques really helped clear up some confusion I had. Can’t wait to try out the advanced settings during my next shoot!
Awesome article guys 🙂 great read and the perfect Astro guide!
Thank you so much. So glad you found the article helpful. Happy photographing.